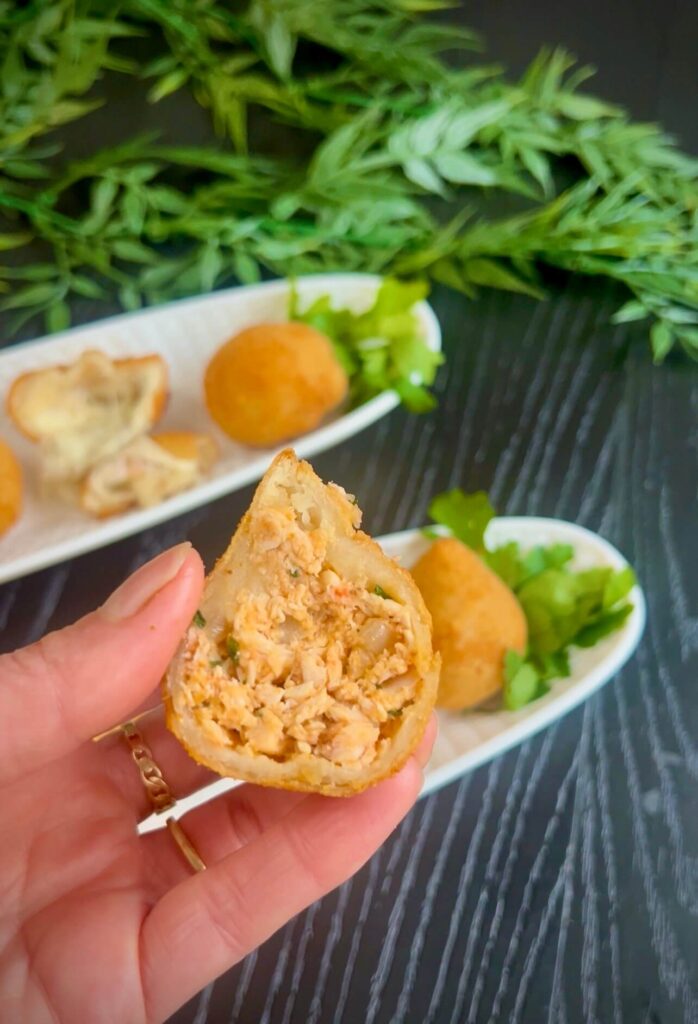
Coxinha is one of Brazil’s most beloved appetizers, instantly recognizable for its teardrop shape and irresistible combination of crispy exterior and soft, flavorful interior. The name “coxinha” literally means “little thigh,” a nod to the traditional filling of shredded chicken, although modern variations often include cheese, chicken and cheese, or even vegetarian options. Each bite offers a perfect balance of textures—the golden, crunchy breadcrumb coating gives way to a tender, savory filling that melts in your mouth.
More than just a snack, coxinha is a cultural staple in Brazil. You’ll find it at street food stalls, bakeries, and family gatherings, often served with a side of hot sauce or fresh herbs. It’s the kind of treat that brings people together, whether it’s for a casual afternoon snack, a festive party, or a special occasion like Ramadan, where it makes a perfect appetizer for sharing.

The beauty of coxinha lies not just in its flavor, but in its versatility. While traditional recipes focus on chicken, creative twists have emerged with fillings like creamy ashta, mozzarella with oregano, or even sweet variations for dessert. Making coxinha at home might seem intimidating at first, but with a few tips and tricks, you can create these golden bites that are just as delicious as anything you’d find in Brazil.
In this post, I’ll guide you step by step on how to make coxinha the easy way—rolling the dough thin, shaping it perfectly, and experimenting with delicious fillings—so you can bring a taste of Brazil right to your kitchen.
- Coxinha ingredients
- How to make coxinha?
- How to cook chicken for coxinha?
- How to make coxinha filling?
- How to make coxinha dough?
- Different filling for coxinha
- How to shape coxinha?
- How to store coxinha?
- Different ways for cooking coxinha
- Frequently asked questions?
- Tips and Tricks
- More Brazilian recipes to try
Coxinha ingredients
Filling
Chicken breast: The main filling of traditional coxinha, shredded chicken provides a tender, flavorful center that pairs perfectly with the dough.
Onion: Adds a natural sweetness and depth to the filling when sautéed, enhancing the overall flavor.
Tomato: Softens while cooking and brings a subtle acidity that balances the richness of the chicken and cream cheese.
Parsley: Fresh parsley adds a hint of freshness and color to the filling, making it more vibrant and aromatic.
Corn: Adds a touch of sweetness and texture, giving each bite a little pop of flavor.
Cream cheese: Makes the filling creamy and smooth, binding the chicken and other ingredients together.
Minced garlic: Provides a fragrant, savory kick that elevates the flavor of the filling.
Salt: Enhances all the flavors in the filling, making it taste well-rounded and savory.
Black pepper: Adds a subtle heat and depth to the filling, balancing the richness of the chicken and cheese.
Oil (2 tbsp): Used for sautéing the onion and garlic, adding flavor and preventing them from sticking to the pan.
Dough
Flour: The base of the dough, flour gives structure and firmness while allowing the coxinha to hold its shape.
Milk: Helps create a soft and pliable dough, contributing to a tender interior.
Chicken broth: Adds extra flavor to the dough so every bite is savory, not just the filling.
Chicken bouillon cubes: Intensify the chicken flavor in the dough for a richer, more savory taste.
Butter: Adds richness and helps make the dough soft and easy to shape.
coating
Breadcrumbs: Provide the classic crispy exterior that contrasts perfectly with the soft filling.
Milk or water (for dipping): Helps the breadcrumbs stick to the dough and can slightly affect crispiness—water gives a slightly crunchier coating.
How to make coxinha?
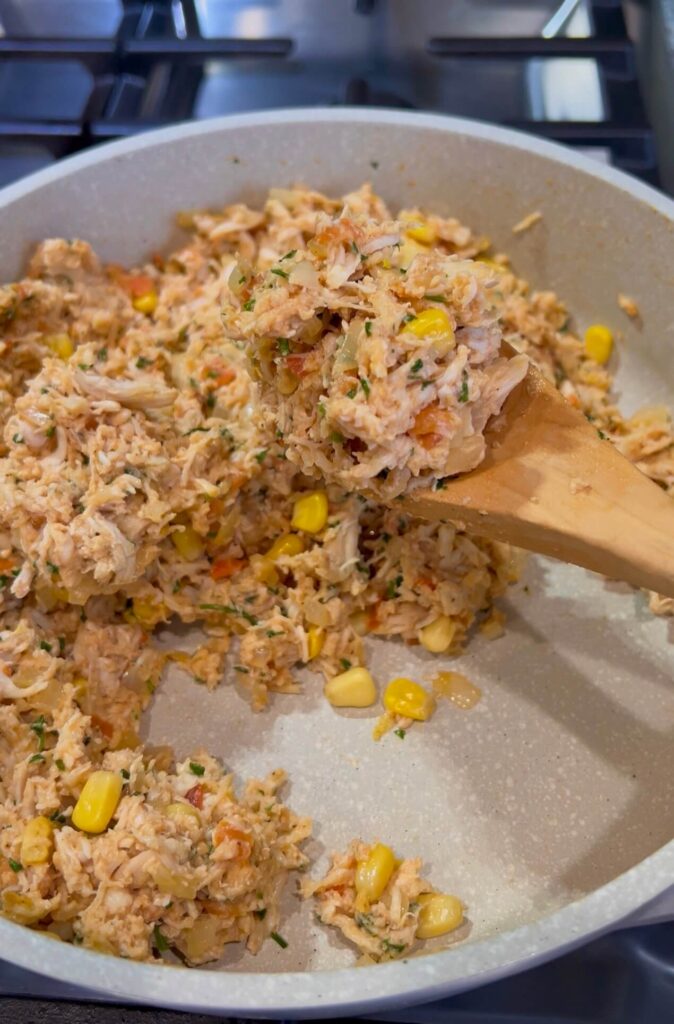
1: Make the filling
- In a pan, heat some oil and sauté the chopped onion for 1 minute.
- Add minced garlic and cook for another minute.
- Add diced tomato and cook for a couple of minutes until soft.
- Add tomato paste, shredded chicken, corn, chopped parsley, cream cheese, salt, and black pepper. Mix well and remove from heat to cool.
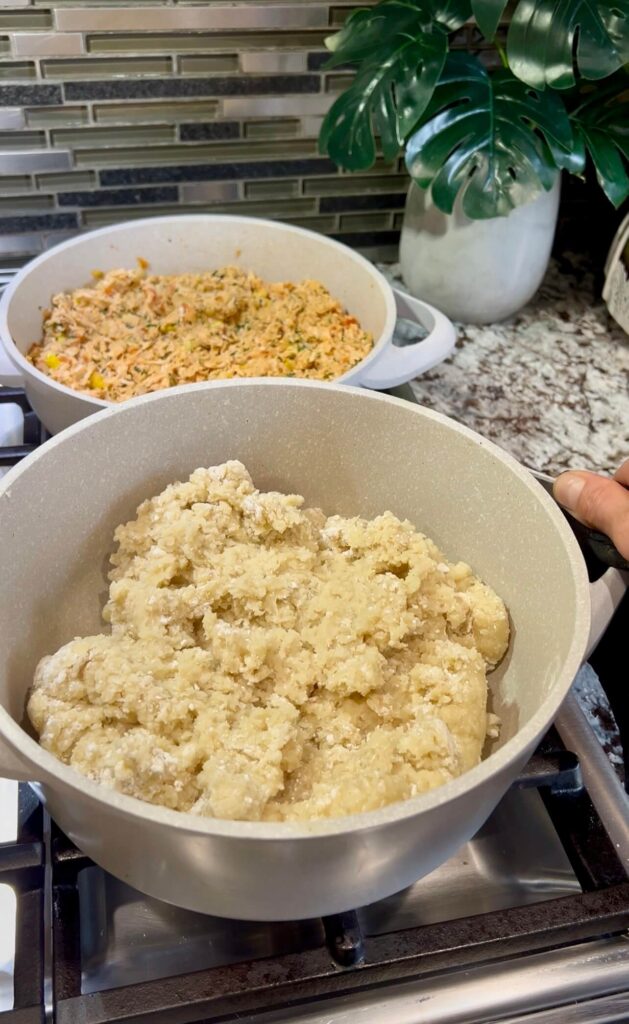
2: Make the dough
- In a pot, combine chicken broth, milk, butter, and chicken bouillon. Bring to a boil, ensuring the bouillon cubes dissolve completely.
- Lower the heat and gradually add flour, stirring until a soft, firm, and non-sticky dough forms.
- Transfer the dough to a stand mixer and mix for a few minutes to make it softer. (You can also knead by hand—be careful, the dough will be hot.)
- Cover the dough to keep it warm while working. If it cools, warm it briefly in the microwave to make shaping easier.

3: Shape the coxinha
Traditional method:
- Take a small piece of dough, flatten it, place filling in the center, then close and shape into a teardrop.
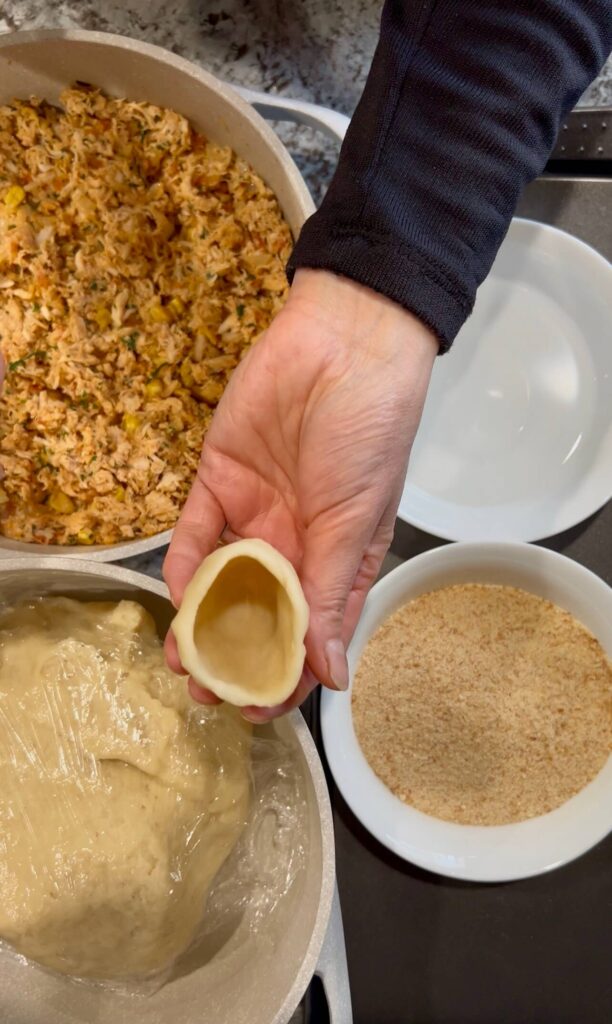
Faster method:
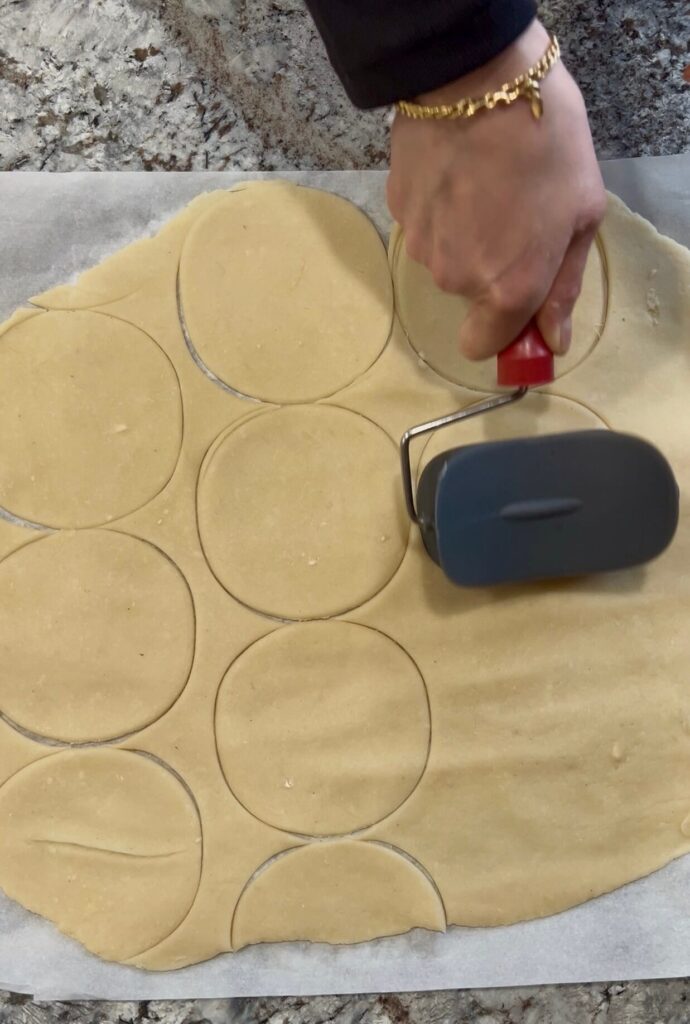
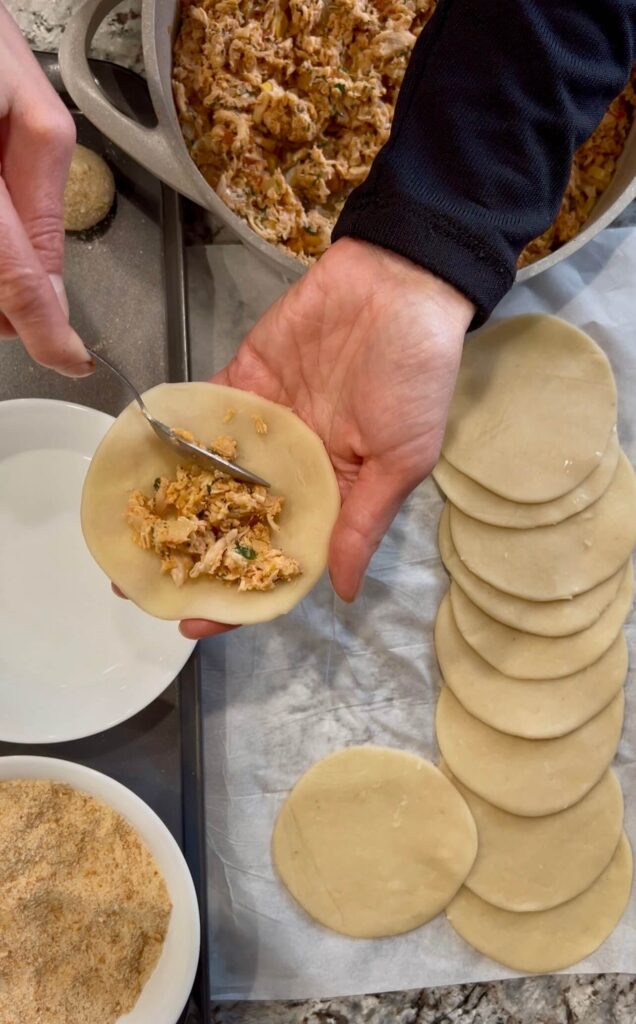
- Roll the dough thin on parchment paper, cut circles using a cutter, place filling in the center, and shape into teardrops. Remove any excess dough at the pointy end for a cleaner shape.
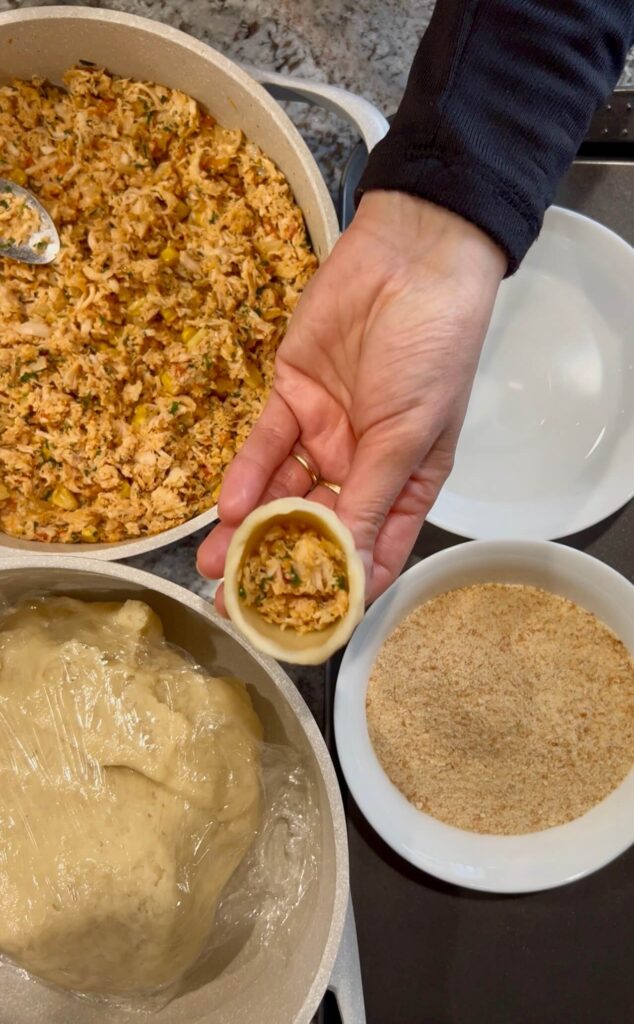
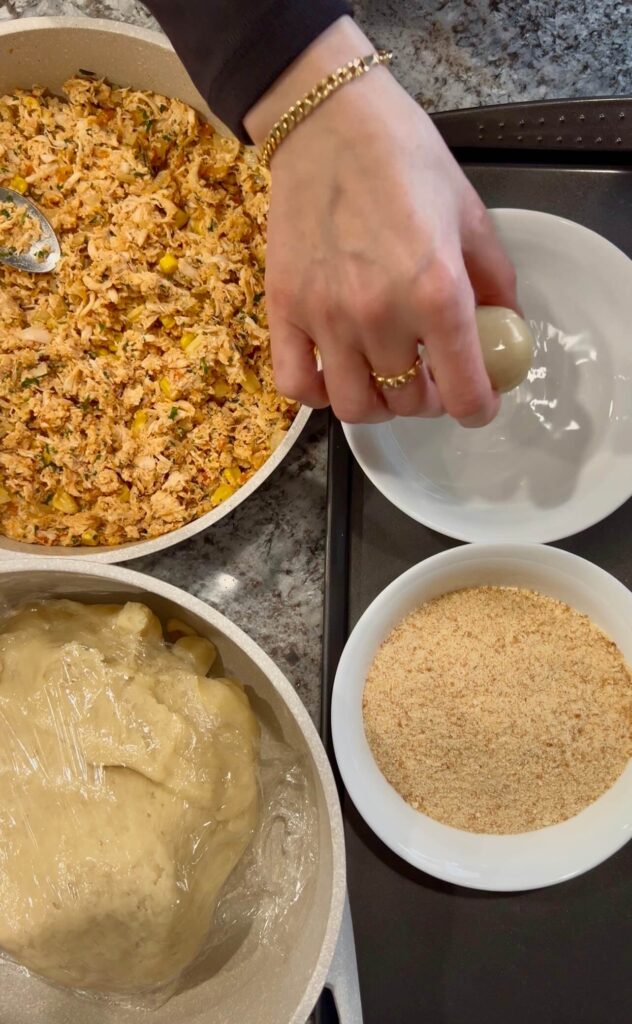
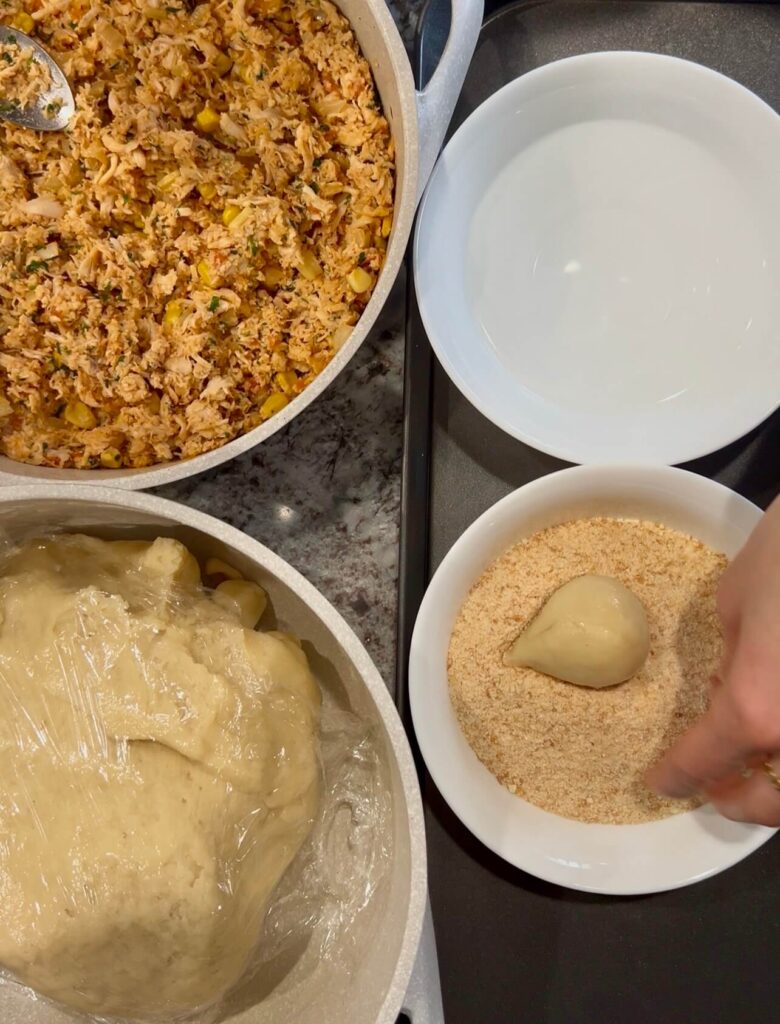
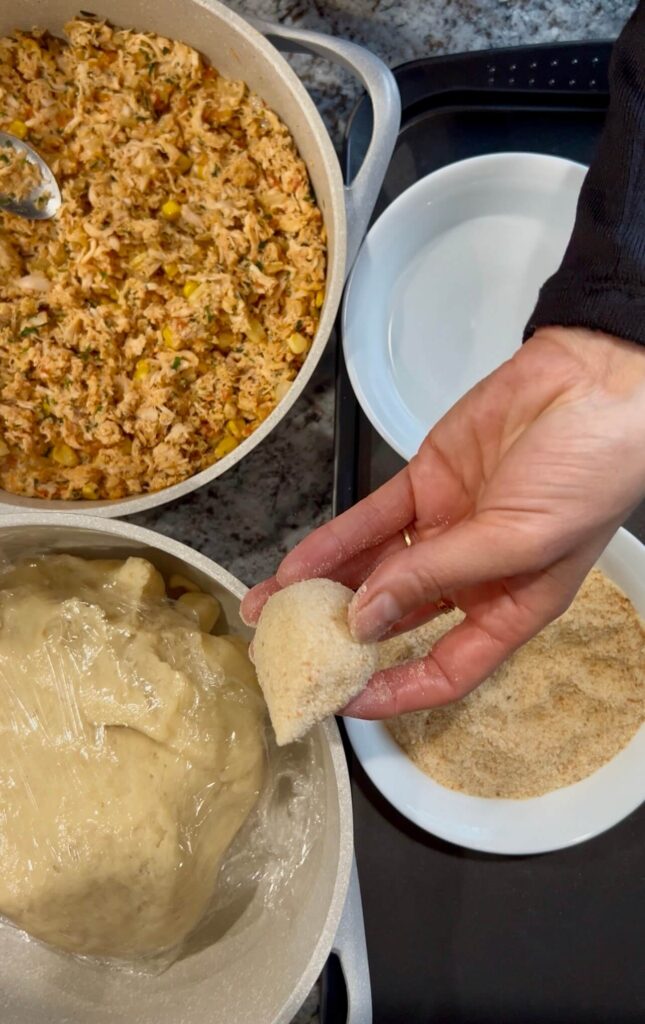
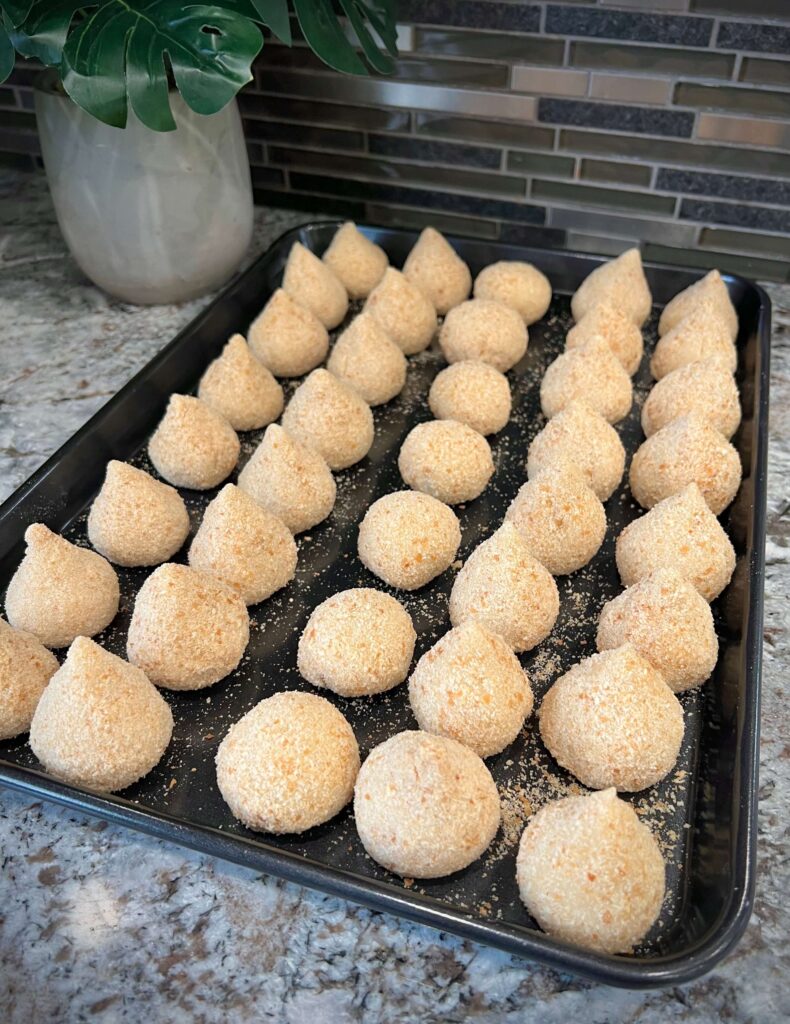
4: Coat and finish
- Dip each shaped coxinha in cold water or milk, then coat with breadcrumbs. Repeat until all are done.
5: optional fillings
- Cheese only, cheese + chicken, or ashta + chicken—delicious variations!
6. Cook or store:
Or freeze for later—if frozen, remove about 15 minutes before frying.
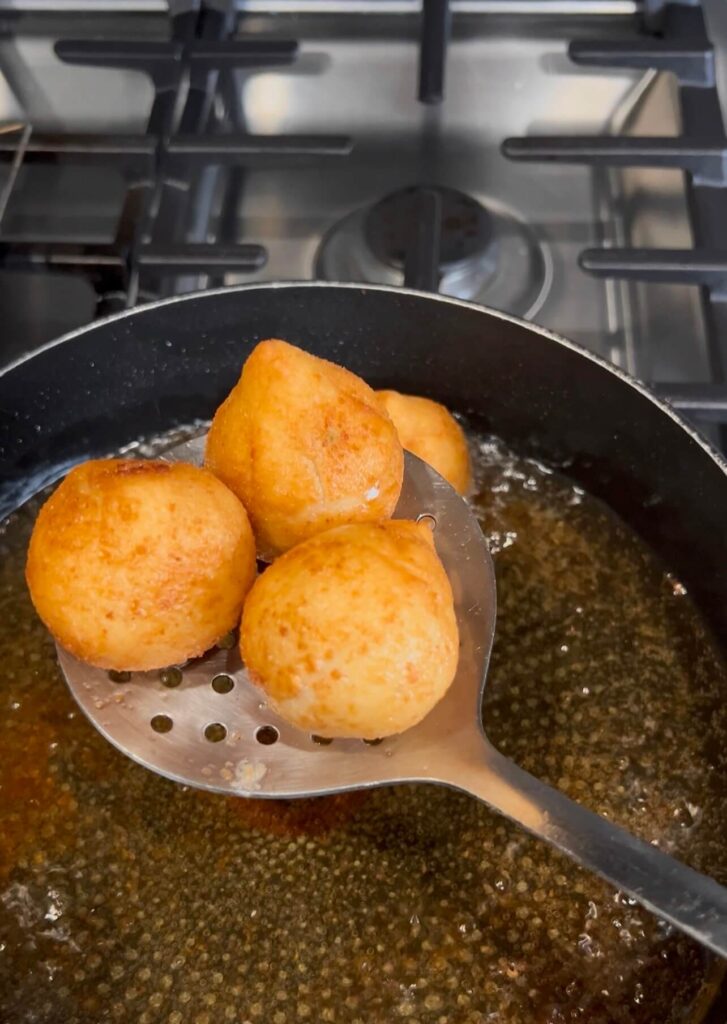
Deep fry over medium-low heat until golden and crispy.
How to cook chicken for coxinha?
You can use store-bought rotisserie chicken or leftover cooked chicken for convenience.
Option 1: Boiled chicken (classic method)
1. Place about 3 chicken breasts in a pot of water.
2. Season with salt and add aromatics like bay leaves, a cinnamon stick, onion, and garlic.
3. Bring to a boil, then lower the heat and simmer until the chicken is fully cooked.
4. Remove the chicken and shred it finely.
Option 2: Pan-cooked chicken
1. Season 3 chicken breasts with salt and pepper.
2. Heat 2 tbsp oil in a pan and sear the chicken on both sides until lightly golden.
3. Lower the heat, cover, and cook until the chicken is fully cooked.
4. Remove and shred the chicken into small pieces.
How to make coxinha filling?
Ingredients:
- 3 chicken breasts, shredded (or store-bought rotisserie/leftover chicken)
- 1 small onion, chopped
- 1 small tomato, chopped
- ¼ cup parsley, chopped
- ¼ cup corn
- 2 tbsp cream cheese
- 1 tsp minced garlic
- 1 tsp salt
- ½ tsp black pepper
- 2 tbsp oil
Optional fillings:
- Shredded mozzarella + dried oregano
- Ashta (thickened cream) + chicken
- Mashed potatoes.
Steps:
- Heat the oil:
In a pan, heat 2 tbsp of oil over medium heat. - Sauté aromatics:
Add chopped onion and sauté for 1 minute until fragrant.
Add minced garlic and cook for another minute. - Cook the tomato:
Add chopped tomato and cook for 2–3 minutes until it softens. - Add chicken and mix-ins:
Add shredded chicken, corn, chopped parsley, cream cheese, salt, and black pepper.
Mix everything well until fully combined. - Cool slightly:
Remove from heat and let the filling cool slightly before shaping the coxinha. - Optional fillings:
- Add shredded mozzarella + oregano for a cheesy version.
- Mix in ashta + chicken for a creamy, rich version.
- Mashed potatoes can also be used for a tasty variation.
How to make coxinha dough?
Ingredients:
- 4 cups flour
- 2 cups milk
- 2 cups chicken broth
- 2 chicken bouillon cubes
- 4 tbsp butter
Steps:
- Combine liquids and butter:
In a pot, pour the chicken broth and milk, add butter and the chicken bouillon cubes. Heat over medium heat until the bouillon cubes dissolve and the mixture comes to a gentle boil. - Add flour gradually:
Lower the heat and slowly add the flour while stirring continuously. This will prevent lumps and help the dough form smoothly. - Cook the dough:
Keep stirring until the mixture becomes a firm, non-sticky dough. It should pull away from the sides of the pot but still feel soft. - Mix or knead:
Transfer the dough to a stand mixer and mix for a few minutes to make it soft and smooth.
- Alternative: Knead by hand. Place the hot dough in a plastic bag and cover with a towel to protect your hands while kneading.
- Keep the dough warm:
Cover the dough while working to prevent it from drying. If it cools, microwave briefly to soften—it’s much easier to shape while warm.
Different filling for coxinha
1. Chicken (traditional)
- Shredded chicken breast with cream cheese, corn, parsley, and seasonings. Classic and flavorful.
2. Chicken + Cheese
- Shredded chicken mixed with shredded mozzarella or cream cheese for a melty, cheesy center.
3. Chicken + Ashta (thickened cream)
- Shredded chicken combined with sweet or neutral ashta for a creamy, rich twist.
4. Cheese only
- Shredded mozzarella or a mix of cheeses with dried oregano for a gooey vegetarian option.
5. Mashed Potato (vegetarian)
- Creamy mashed potatoes seasoned with salt, pepper, and optional herbs. Easy, comforting, and vegetarian-friendly.
6. Spinach + Cheese (vegetarian)
- Sautéed spinach mixed with cream cheese or ricotta and a little nutmeg or garlic. Healthy and flavorful.
7. Mushrooms + Cheese (vegetarian)
- Sautéed mushrooms with onions, garlic, and cheese. Adds umami flavor and a hearty filling.
8. Sweet Fillings (optional dessert coxinha)
- Sweetened cream cheese, chocolate, or Nutella for a dessert version. For thr dough make it only with milk and water no chicken broth or chicken boullion and you can add little bit of sugar and vanilla.
How to shape coxinha?
Traditional Method (by hand):
- Take a small piece of dough (about the size of a golf ball).
- Flatten it slightly in your palm to form a small disc.
- Place 1–2 teaspoons of filling in the center.
- Bring the edges of the dough up around the filling and pinch them together at the top.
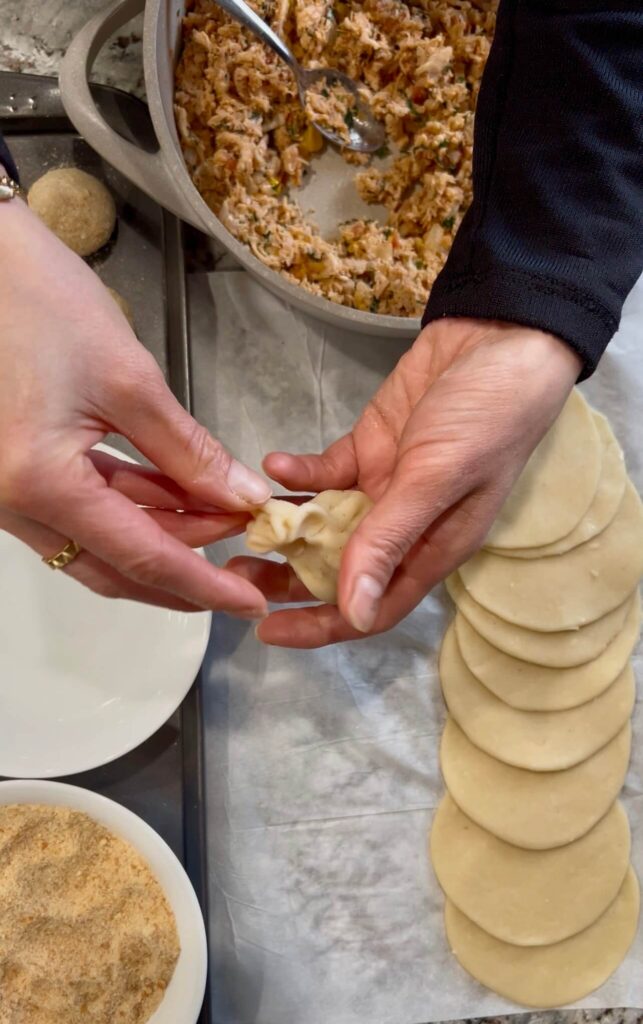
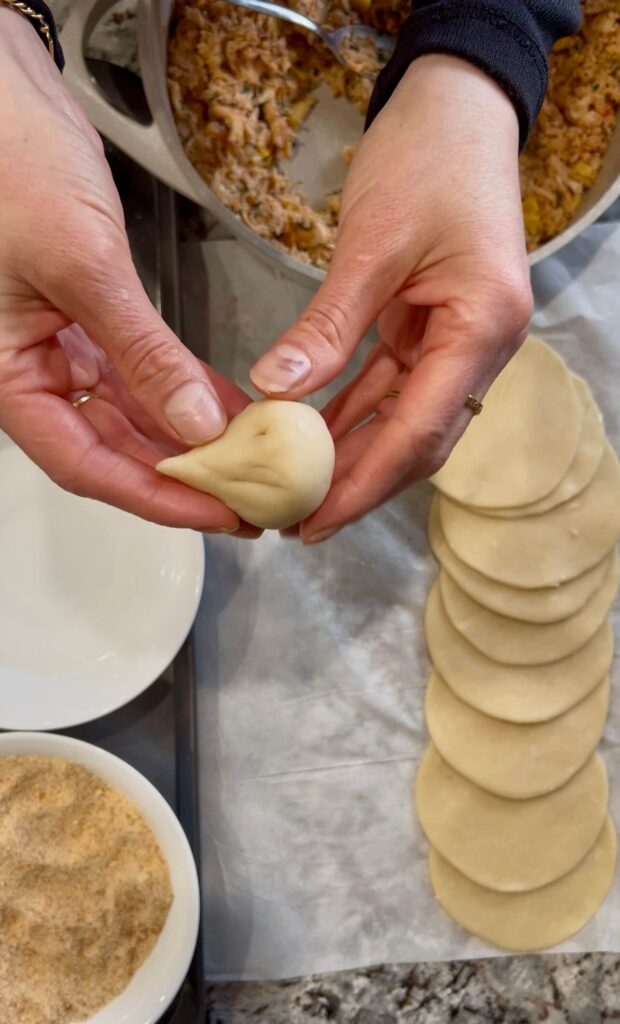
- Shape the dough into a teardrop (or “eye-drop”) shape by gently rolling and pinching the pointy end.
- Remove any extra dough at the pointy tip so it’s not too thick, which helps prevent opening during frying.
Faster Method (rolling & cutting):
- Roll the dough thin on a lightly floured surface or parchment paper.
- Use a round cutter (or a cup) to cut circles in your preferred size.
- Place a spoonful of filling in the center of each circle.
- Bring the edges together and shape into a teardrop. Remove excess dough at the tip for a clean pointy shape.
How to store coxinha?
1. Storing before frying:
- Shape and coat the coxinhas, then place them on a tray in a single layer.
- Cover with plastic wrap or parchment paper and freeze.
- Once frozen, transfer to an airtight freezer bag or container.
- They can be stored for up to 1–2 months.
- When ready to fry, take them out 10–15 minutes before cooking—no need to thaw completely.
2. Storing after frying:
- Let the coxinhas cool completely.
- Place in an airtight container and refrigerate for up to 3–4 days.
- Reheat in the oven at medium heat for 5–10 minutes to restore crispiness.
3. Tips for best results:
- Avoid leaving shaped or cooked coxinha at room temperature for long periods—they can dry out or spoil.
- Freeze in a single layer first so they don’t stick together.
Different ways for cooking coxinha
1. Deep Frying (Classic Method)
- Heat oil over medium-low heat in a deep pan or fryer.
- Fry coxinhas until golden and crispy, about 4–6 minutes, depending on size.
- Turn occasionally to ensure even cooking.
- Pros: Crispiest exterior and traditional taste.
- Tip: Don’t overcrowd the pan; fry in batches for even results.
2. Oven-Baked (Healthier Option)
- Preheat the oven to 375°F (190°C).
- Brush the coxinhas lightly with oil or spray with cooking spray.
- Place on a lined baking tray and bake for 20–25 minutes, turning halfway through until golden.
- Pros: Less oil, still crispy outside if brushed with oil.
- Tip: Use thin dough and don’t overfill for the best texture.
3. Air Fryer (Quick & Low-Oil Method)
- Preheat the air fryer to 360°F (180°C).
- Place coxinhas in a single layer in the basket.
- Air fry for 12–15 minutes, shaking or turning halfway through.
- Pros: Crispy texture with minimal oil, faster than oven baking.
- Tip: Spray lightly with oil for extra crunch.
4. Freezing Before Cooking
- Shape and coat coxinhas, then freeze in a single layer.
- When ready to cook, deep fry, bake, or air fry straight from the freezer—no need to thaw completely.
Frequently asked questions?
1. Can I use store-bought or leftover chicken?
Yes! Rotisserie chicken or leftover cooked chicken works perfectly. Just shred it finely before making the filling.
2. Can I make the dough in advance?
Yes, you can make the dough ahead of time. Keep it covered to prevent it from drying out. If it cools, microwave briefly to soften before shaping.
3. Can I freeze coxinha before frying?
Absolutely! Shape and coat the coxinhas, place them on a tray to freeze, then store in a bag. Fry them straight from the freezer—just take them out 10–15 minutes before frying.
4. What’s the best way to shape coxinha?
You can shape them by hand into teardrop shapes (traditional method) or roll the dough thin, cut circles, fill, and shape (faster method). The thinner the dough, the crispier the coxinha.
5. Can I make vegetarian coxinha?
Yes! Fillings like mashed potatoes, spinach + cheese, mushrooms + cheese, or just cheese work perfectly.
6. Should I dip coxinha in milk or water before coating?
Both work. Water tends to give a slightly crispier coating, while milk adds a little richness.
7. What’s the best frying method?
Deep fry over medium-low heat until golden and crispy. High heat can burn the breadcrumbs before the inside is cooked.
Tips and Tricks
1. Keep the dough warm:
Always cover the dough while working to prevent it from drying out. Warm dough is much easier to shape and less likely to crack. If it cools, microwave for a few seconds.
2. Roll it thin:
The thinner the dough, the crispier the coxinha and the less doughy it will feel inside.
3. Don’t overfill:
Use small amounts of filling so the coxinha is easy to shape and won’t open while frying.
4. Seal the tip properly:
When shaping the teardrop, remove excess dough at the pointy end and pinch lightly to prevent it from opening during frying.
5. Use a stand mixer for the dough:
After cooking on the stove, knead the dough with a stand mixer for a few minutes to make it soft and smooth. It’s easier than kneading by hand, especially when the dough is hot.
6. Dipping liquid:
Dip coxinha in cold water or milk before coating with breadcrumbs. Water usually gives a slightly crispier result.
7. Fry slowly:
Always fry over medium-low heat so the outside gets golden and crispy without burning, while the inside cooks perfectly.
8. Experiment with fillings:
Try classic chicken, chicken + cheese, chicken + ashta, cheese only, mashed potatoes, or spinach + cheese for vegetarian options.
9. Make ahead & freeze:
Shape and coat coxinha, then freeze. Fry straight from the freezer when needed—take them out 10–15 minutes before frying.
10. Safety tip:
Handle hot dough and oil carefully. Use a towel or plastic bag when kneading hot dough, and never overcrowd the frying pan.
More Brazilian recipes to try

Coxinha
Ingredients
Filling
- 4 cups chicken breasts shredded
- 1 small onion chopped
- 1 small tomato chopped
- ¼ cup parsley chopped
- ¼ cup corn
- 2 tbsp cream cheese
- 2 garlic cloves minced
- 1 tsp salt
- ½ tsp black pepper
- 2 tbsp oil
Dough
- 4 cups flour
- 2 cups milk
- 2 cups chicken broth
- 2 chicken bouillon cubes
- 4 tbsp butter
Coating
- 1 cup Cold water or cold milk
- 1 cup breadcrumbs
Optional fillings
- Shredded mozzarella + dried oregano
- Ashta thickened cream + chicken
- Mashed potatoes
Instructions
- Make the filling:
- In a pan, heat some oil and sauté the chopped onion for 1 minute.
- Add minced garlic and cook for another minute.
- Add diced tomato and cook for a couple of minutes until soft.
- Add tomato paste, shredded chicken, corn, chopped parsley, cream cheese, salt, and black pepper. Mix well and remove from heat to cool.
- Make the dough:
- In a pot, combine chicken broth, milk, butter, and chicken bouillon. Bring to a boil, ensuring the bouillon cubes dissolve completely.
- Lower the heat and gradually add flour, stirring until a soft, firm, and non-sticky dough forms.
- Transfer the dough to a stand mixer and mix for a few minutes to make it softer. (You can also knead by hand—be careful, the dough will be hot.)
- Cover the dough to keep it warm while working. If it cools, warm it briefly in the microwave to make shaping easier.
- Shape the coxinhas:
- Traditional method:
- Take a small piece of dough, flatten it, place filling in the center, then close and shape into a teardrop.
- Faster method:
- Roll the dough thin on parchment paper, cut circles using a cutter, place filling in the center, and shape into teardrops. Remove any excess dough at the pointy end for a cleaner shape.
- Coat and finish:
- Dip each shaped coxinha in cold water or milk, then coat with breadcrumbs. Repeat until all are done.
- Optional fillings:
- Cheese only, cheese + chicken, or ashta + chicken—delicious variations!
- Cook or store:
- Deep fry over medium-low heat until golden and crispy.
- Or freeze for later—if frozen, remove about 15 minutes before frying.
Notes
- Always keep the dough covered to prevent it from drying out. Dry dough can break or open while shaping.
- Work with the dough while warm; if it cools, microwave for a few seconds to soften.
- Thinner dough makes the coxinha crispier and less doughy inside.
- Don’t overfill—small amounts of filling are easier to shape and seal.
- Pinch the tip of the teardrop properly and remove excess dough at the pointy end to prevent opening while frying.
- Use a stand mixer for kneading to make the dough soft and smooth; hand kneading works too, but protect your hands with a towel or plastic bag if the dough is hot.
- Dip in cold water or milk before coating with breadcrumbs. Water gives slightly crispier results.
- Fry over medium-low heat for golden, crispy coxinhas.