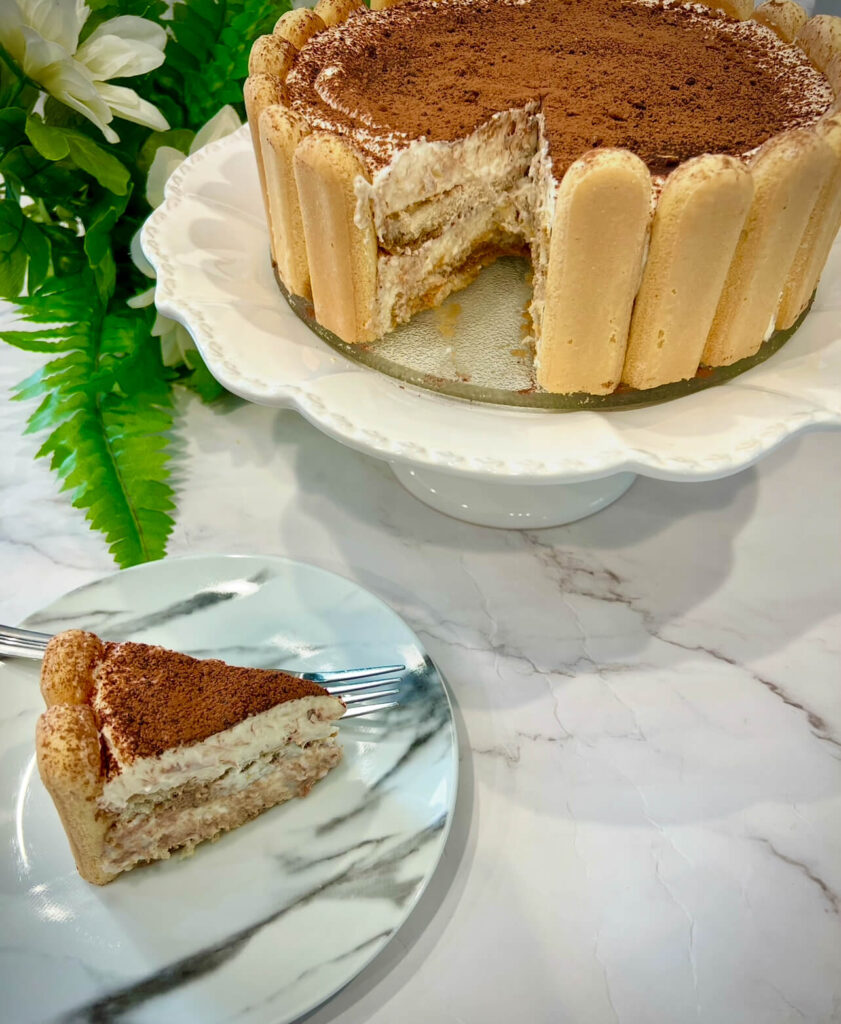
Tiramisu—a classic Italian dessert that’s rich, creamy, and full of flavor. Traditionally made with eggs and mascarpone, it’s a favorite around the world for good reason. But today, I’m sharing my twist: a no-bake, egg-free version that’s just as delicious—and even easier to make.
This version is light yet satisfying, simple to prepare, and perfect for warm days when turning on the oven is the last thing you want to do. It’s a crowd-pleaser that comes together in minutes and only needs a handful of ingredients you might already have at home.
Tiramisu Ingredients
whipping cream: which gives the dessert its soft, airy texture and helps create that signature creamy layer.
Sweetened condensed milk: It blends perfectly with the cream and adds a rich, smooth sweetness.
Cream cheese: It’s easier to find, more affordable, and still gives the filling a lovely creamy texture with just a touch of tang.
ladyfinger: light, crisp cookies that soak up coffee beautifully and give tiramisu its signature bite.
coffee: a strong brew (or instant coffee mixed with hot water) adds depth and that bold flavor tiramisu is known for.
cocoa powder: brings everything together, adding that perfect hint of chocolate in every bite.

How to make tiramisu?
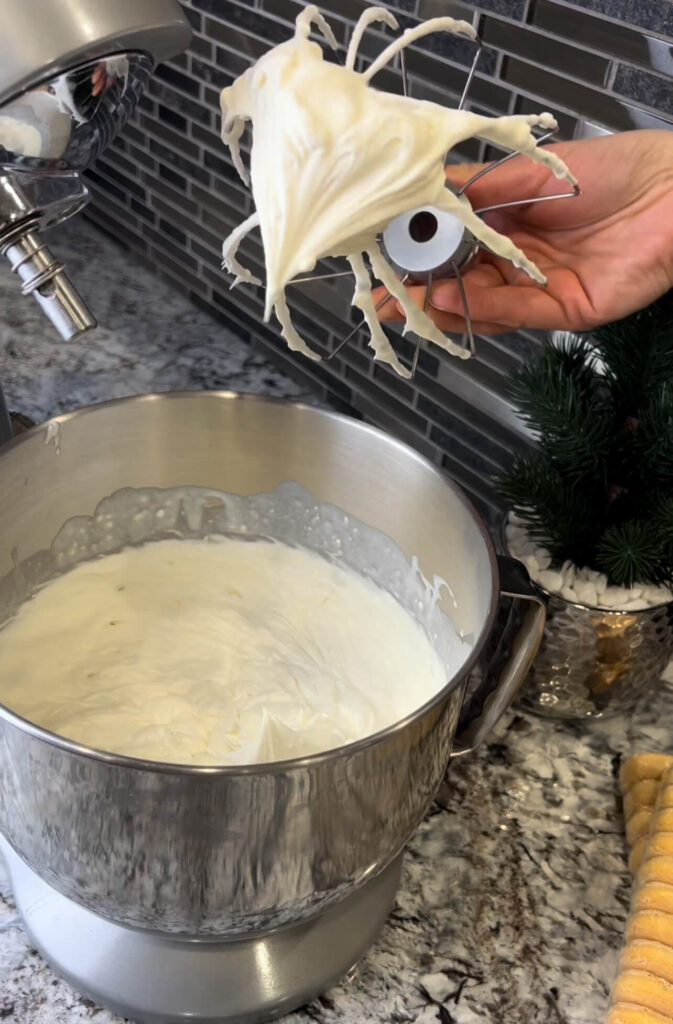
Step 1: Whip the Cream Mixture
In a large bowl, add the whipping cream, sweetened condensed milk, and cream cheese.
Whisk everything together using a hand mixer or stand mixer until the mixture becomes thick and forms stiff peaks. Set it aside.
Step 2: Prepare the Coffee
Brew a strong cup of coffee, or mix instant coffee with hot water (you can even use milk for a softer taste).
Let it cool slightly before using.
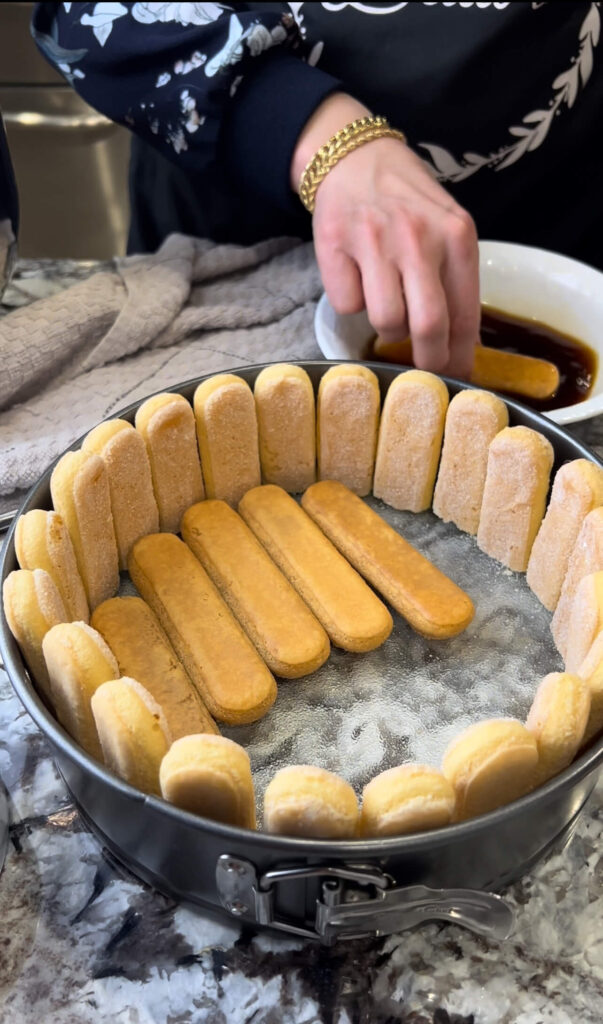
Step 3: Get Your Dish Ready
Grab your serving dish or tray and have your ladyfingers ready. You can cut them if needed to fit your dish neatly.
Step 4: Start Layering
Quickly dip each ladyfinger into the coffee—don’t soak it too long or it’ll get mushy.
Lay them flat in a single layer at the bottom of your dish.
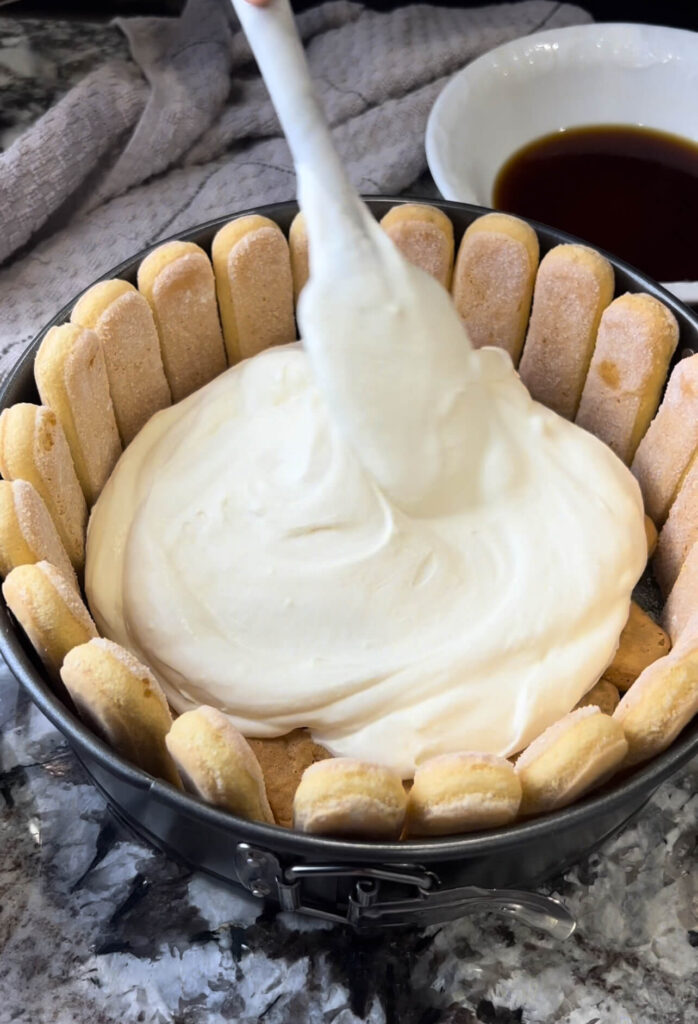
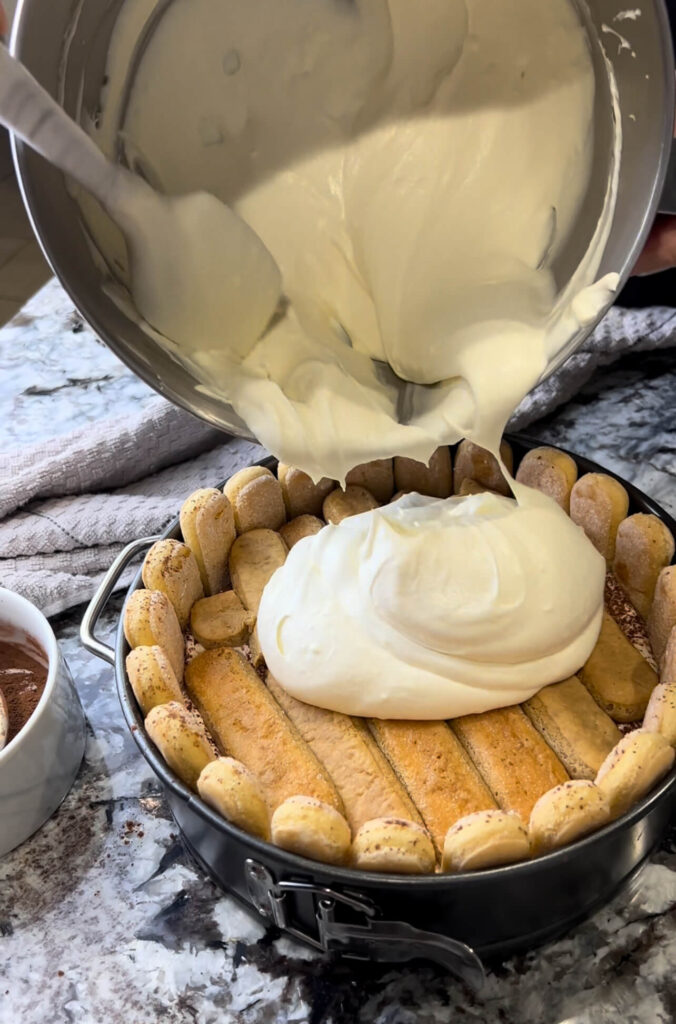
Step 5: Add the Cream Layer
Spread a generous layer of the whipped cream mixture over the ladyfingers.
Use a spatula to smooth it out evenly.
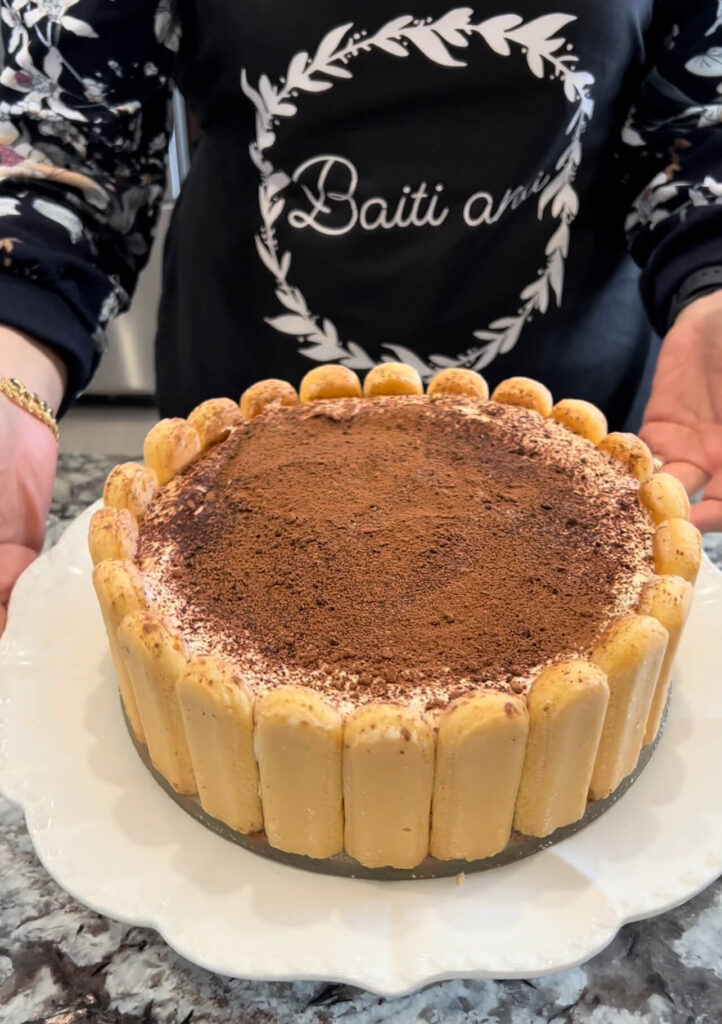
Step 6: Sprinkle with Cocoa
Sift or sprinkle cocoa powder evenly over the cream layer.
Step 7: Repeat the Layers
Add another layer of dipped ladyfingers, followed by another layer of cream, and finish with a final dusting of cocoa powder on top.
Step 8: Chill
Cover the dish and refrigerate for at least 8 hours or overnight for best flavor and texture.
If you’re in a hurry, freeze it for 1–2 hours to help it firm up faster.
Step 9: Serve and Enjoy!
Once chilled, slice it up and serve! The layers will be soft, creamy, and absolutely delicious.

How to store tiramisu?
In the Fridge:
Cover the tiramisu tightly with plastic wrap or store it in an airtight container.
It will stay fresh in the refrigerator for up to 4–5 days. The flavors actually get better the next day, so it’s a perfect make-ahead dessert!
In the Freezer:
Yes, you can freeze it! Wrap it well in plastic wrap and then in foil, or use a freezer-safe container.
It can be frozen for up to 2 months. When you’re ready to enjoy it, thaw it in the fridge overnight.
Serving Tip:
If you freeze it, you can also serve it semi-frozen like an ice cream cake—it tastes amazing that way too!
Different Ways to Serve Tiramisu
1. Classic Tray Style
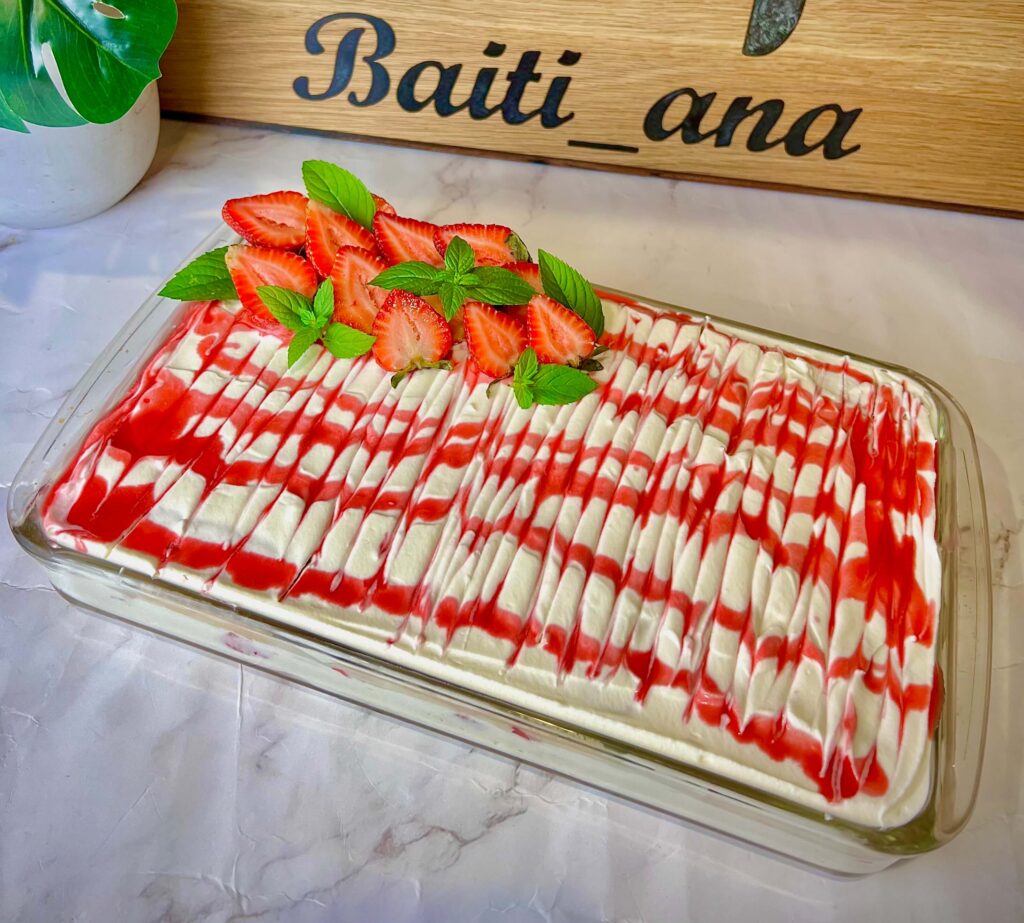
The traditional way! Layer your tiramisu in a square or rectangular dish (like a Pyrex or glass baking tray). It’s easy to cut into slices and perfect for serving a crowd.
2. Tiramisu Cups (Individual Servings)
Great for parties, events, or Ramadan Iftars. Layer the dipped ladyfingers and cream in glass cups, ramekins, or even mini dessert jars.
They look beautiful and are super convenient—no slicing needed!
3. Loaf Pan Style
Perfect if you want clean, tall layers. Line a loaf pan with plastic wrap, build your layers, and chill. When set, lift it out and slice like a cake for an elegant presentation.
4. Trifle Bowl or Dessert Glass Dish
For a more dramatic look, use a trifle bowl or any large glass dish. The clear sides show off the layers beautifully—great for family gatherings or dinner parties.
5. Mini Tiramisu Bites (Muffin Tin)
Line a muffin tin with cupcake liners and build mini tiramisus in each cup. Chill until firm, then serve as bite-sized desserts—perfect for kids or dessert tables!
6. No-Layer Tiramisu (Mix Everything In)
If you’re short on time, just break up the ladyfingers, mix them with the cream mixture and coffee, and serve it in bowls. Not traditional, but still super tasty and fast!
7. Tiramisu Cake Style
Layer it in a springform pan and refrigerate overnight. Once it sets, remove the ring and slice like a layered cake. Beautiful for birthdays or celebrations!
Frequently asked questions
1. Can I make tiramisu without mascarpone?
Yes! This recipe uses cream cheese instead of mascarpone. It’s easier to find, more affordable, and still gives you that creamy texture with a slight tang.
2. What can I use instead of ladyfingers?
If you can’t find ladyfingers, you can use sponge cake, vanilla wafers, or plain tea biscuits. Just make sure they’re dry enough to soak up the coffee.
3. Can I use instant coffee?
Absolutely! Mix 1 tablespoon of instant coffee with 1 cup of hot water. You can also use brewed espresso or strong brewed coffee.
4. How long does tiramisu need to chill?
For the best texture and flavor, chill it for at least 8 hours or overnight. This allows the layers to set and the flavors to develop.
5. Can I freeze tiramisu?
Yes! Tiramisu freezes very well. Wrap it tightly and freeze for up to 2 months. Thaw in the fridge overnight before serving, or enjoy it
Tips and Tricks
1. Use cold whipping cream
Make sure your cream is cold before whipping—it helps it whip faster and hold its shape better.
2. Don’t soak the ladyfingers too long
A quick dip in the coffee is all you need. Soaking too long makes them soggy and messy to layer.
3. Let it chill overnight
For the best texture and flavor, refrigerate for at least 8 hours—or overnight. This helps the layers set and the flavors blend beautifully.
4. Sift your cocoa powder
For a clean, even look on top, use a small sifter or fine mesh strainer to dust the cocoa powder gently.
5. Try flavored coffee
Want to change things up? Use vanilla, hazelnut, or caramel-flavored coffee to give your tiramisu a twist.
6. Add chocolate shavings or chips
For extra texture and richness, sprinkle some chocolate chips or shaved chocolate between layers or on top.
7. Make it in advance
Tiramisu holds up really well for 2–3 days in the fridge. It’s a perfect make-ahead dessert for parties or holidays.
8. Serve it cold (or semi-frozen!)
If you like a firmer texture, freeze the tiramisu for 1–2 hours before serving. It tastes amazing and slices cleanly like ice cream cake.
9. Use a hot knife for clean slices
Run your knife under hot water, wipe it dry, and slice for those neat, professional-looking layers.
Product Links
More no bake recipes


Tiramisu
Ingredients
- 2 cups whipping cream
- 1 can sweetened condensed milk 300ml
- 1 package ladyfingers 400g
- 1/2 cup cream cheese
- 1/4 cup cocoa powder or more to taste
- 1 cup strong brewed coffee or 1 tbsp instant coffee mixed with 1 cup hot water
Instructions
- In a bowl, add the whipping cream, sweetened condensed milk, and cream cheese.
- Whisk until stiff peaks form.
- Prepare your coffee and let it cool down (or mix instant coffee with water or milk).
- Cut the ladyfingers and place them around your pan.
- Dip each ladyfinger in the coffee and layer them in the pan. Add a layer of the cream mixture on top, then sprinkle with cocoa powder.
- Repeat the layers until everything is used up.
- Refrigerate for at least 8 hours or overnight before serving—or freeze for a couple of hours to make it more firm.
Notes
- Use cold whipping cream for best results when whipping.
- Don’t soak ladyfingers too long in coffee to avoid sogginess.
- Let the tiramisu chill at least 8 hours or overnight for the best texture and flavor.
- You can substitute cream cheese with mascarpone if you prefer.
- Store leftovers covered in the fridge for up to 4–5 days.
- This recipe can be frozen for up to 2 months—thaw overnight before serving.
- For a stronger coffee flavor, add a splash of coffee liqueur (optional).